Holiday Cocktail Party
1/4/2024 | 26m 56sVideo has Closed Captions
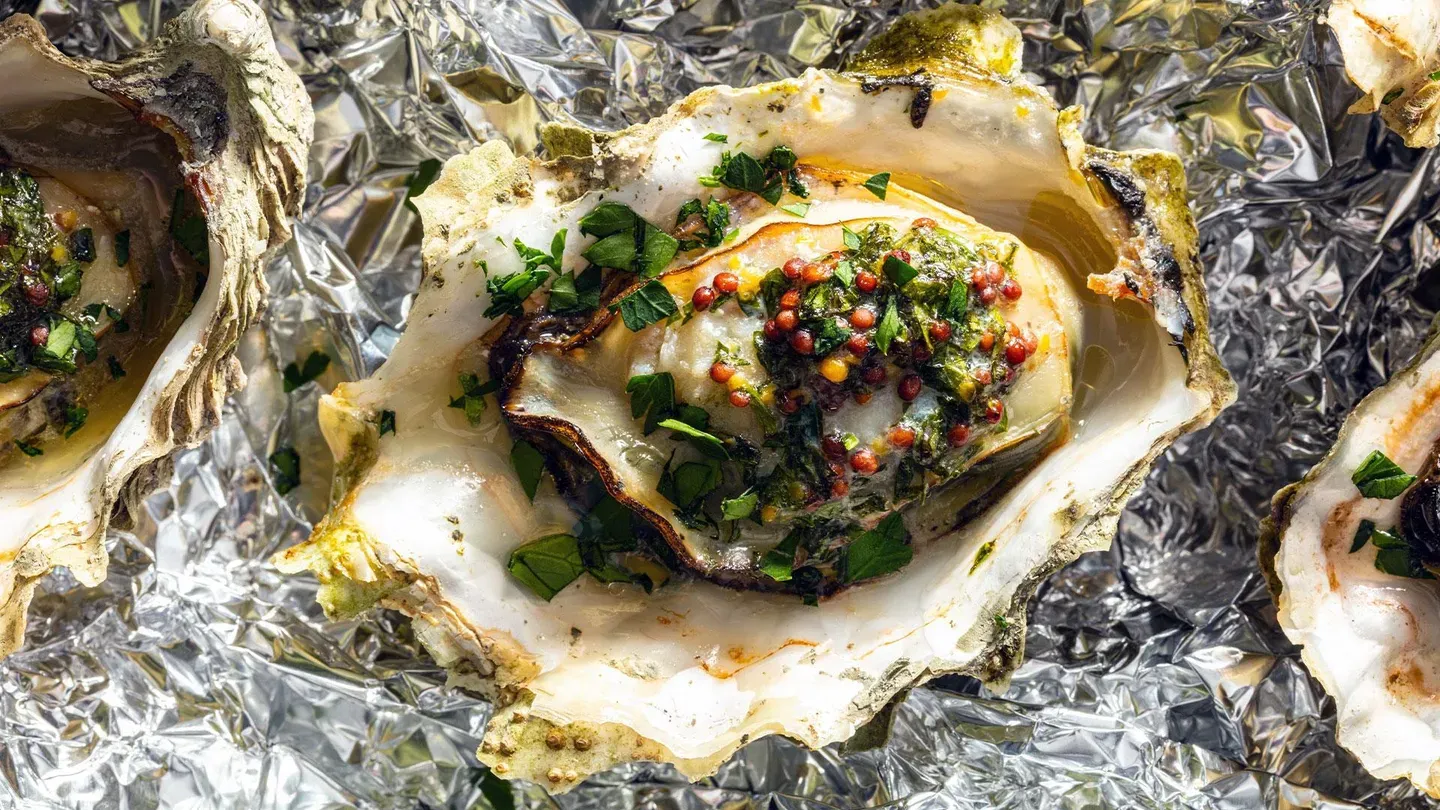
Roasted Oysters, Baked Brie, Bruschetta with Artichoke and Non-alcoholic cocktails.
Lan Lam makes Bridget Lancaster Roasted Oysters with Mustard Butter. Dan Souza makes Julia Collin Davison Baked Brie en Croûte. Jack challenges Bridget to a tasting of non-alcoholic cocktails, and Erin McMurrer makes Julia Bruschetta with Artichoke Hearts & Parmesan.
Problems with Closed Captions? Closed Captioning Feedback
Problems with Closed Captions? Closed Captioning Feedback
America's Test Kitchen is presented by your local public television station.
Distributed nationally by American Public Television
Holiday Cocktail Party
1/4/2024 | 26m 56sVideo has Closed Captions
Lan Lam makes Bridget Lancaster Roasted Oysters with Mustard Butter. Dan Souza makes Julia Collin Davison Baked Brie en Croûte. Jack challenges Bridget to a tasting of non-alcoholic cocktails, and Erin McMurrer makes Julia Bruschetta with Artichoke Hearts & Parmesan.
Problems with Closed Captions? Closed Captioning Feedback
How to Watch America's Test Kitchen
America's Test Kitchen is available to stream on pbs.org and the free PBS App, available on iPhone, Apple TV, Android TV, Android smartphones, Amazon Fire TV, Amazon Fire Tablet, Roku, Samsung Smart TV, and Vizio.
Providing Support for PBS.org
Learn Moreabout PBS online sponsorship♪♪ ♪♪ ♪♪ ♪♪ -Today on "America's Test Kitchen," Lan makes Bridget roasted oysters on the half shell with mustard butter, Dan makes Julia baked Brie en Croûte, Jack challenges Bridget to a tasting of nonalcoholic spirits and cocktails, and Erin makes Julia bruschetta with artichoke hearts and Parmesan.
It's all coming up right here on "America's Test Kitchen."
♪♪ "America's Test Kitchen" is brought to you by the following.
-Plugrà European-style butter was created for all chefs, cooks, and bakers, slow-churned with 82% butterfat for a smooth texture and more pliability for flaky crusts.
Plugrà -- from professional kitchens to your home.
-Sur La Table, where you can discover an assortment of provisions for your next meal or gathering, from cookware and tools from a wide variety of kitchen brands to hands-on cooking classes.
Visit us at surlatable.com.
♪♪ -Freshly shucked oysters are truly one of life's pleasures, but not everyone is inclined to enjoy those raw little bivalves, let alone shuck them.
And if I've just described you, you need to stick around, because Lan's here, and she's got a great recipe that might convert you over to the oyster world.
-I'm actually hoping to convert people who only eat raw shellfish... -Ooh.
-...into trying this.
I was one of those people.
This recipe is amazing.
Here we go.
I've got some oysters here, and they're fairly large.
They are 2 1/2 to 3 inches long.
They have a nice, deep cup... -Mmm.
-...for holding all of that delicious liquor.
And we're gonna roast these.
The only thing is, if I were to put this down on a rimmed baking sheet, most of them would tip over and we'd lose that juice, especially in the transition in and out of the oven.
-Right.
-So I'm gonna make a little bed for the oysters to hang out on while they're cooking, and I'm doing it with an 18-inch length of aluminum foil.
So I'm gonna crumple this up, uncrumple it, and lay it on the rimmed baking sheet.
We just need something there to rest the oysters on.
It does not have to look pretty.
-Great.
-Now I'm just gonna arrange these on here.
I want to make sure I'm using an 18x13-inch rimmed baking sheet.
Sometimes they come a little bit smaller.
That's not quite large enough to hold all these oysters.
So I have a 450-degree oven.
The rack is set to the middle position.
I'm just gonna pop this in and let that go for maybe 5 minutes.
I'm just looking for most of the oysters to pop open.
They won't all pop open.
-Eh, not a lot of action in there.
-I mean, it's only been 5 minutes... -Sure.
-...but we'll get there.
-Oh, I see something might be happening.
-If you look carefully, you'll notice some of them are just starting to, like, open up the tiniest bit.
And that's all we're looking for here.
They don't all have to open, we're just looking to soften them up, make them a little bit easier to shuck.
Before we do, though, I'm gonna make the sauce for this.
And it's gonna be just a simple compound butter.
-Lovely.
-I've got 5 tablespoons of softened unsalted butter, and I'm adding to that 2 tablespoons of minced parsley.
And that's 1 tablespoon of whole-grain mustard.
And I'm just gonna mash this together.
-That was easy.
It smells great.
-Yeah, nice and simple.
I'm gonna set this aside, and we're just gonna give these oysters 5 minutes to cool down so that we can get to shucking.
-Great.
-Bridget, it's been 5 minutes.
I'm gonna start shucking.
You're welcome to join me.
-Yay!
-They should be cool enough to handle, and if you've never shucked before, this is really a good way to learn.
So if I were shucking raw oysters, I'd be a little bit more cautious, 'cause you really need some pressure... -Yes.
-...and some wrist strength to pop that top off.
With these, it's a lot easier.
You can just kind of wiggle the knife in and give it a twist, and it just pops right open.
But once you've popped that hinge, you run your knife along the top shell.
The only other thing is you want to cut below so that whoever you're serving isn't struggling to slurp the oyster.
That's always awkward when that muscle isn't released.
But I'll just set these back where I got them, making sure that they stay upright and those juices remain in the shell.
Now that these are shucked, let's get some butter on here and finish roasting.
I'm just gonna divide this butter amongst all these oysters so it ends up being about 3/4 of a teaspoon of butter per oyster.
But, really, you're just dividing it evenly amongst all the shells.
So back into that 450 oven.
These are gonna go for 5 to 8 minutes.
The time isn't super important.
What I really want is to nail the final temp.
I'm looking for 160 to 165 degrees.
-Okay.
[ Sniffs ] Oh!
-Buttery... -Oh!
-...oceany, delicious.
-Mmm!
-This looks great.
I just want to make sure this is food-safe.
And the best way to do that is to take a temperature.
-Okay.
-I am looking for the largest of the bunch, because once the biggest one is there, all the little guys are there, too.
Eh, this one looks pretty good, and I just want to make sure this gets to 160, 165-ish.
That looks great.
-So raw oysters -- they're cultivated so that you can eat them raw.
They're really safe to eat.
-Mm-hmm.
-But, so when you cook oysters, you have to take their temp?
-Yeah, so heating them a little bit makes them a little iffy.
And so since we're heating them a little, we got to get them all the way up to a food-safe temperature.
-Great.
Are they ready to eat?
-We're just gonna give these 5 minutes to cool slightly, then we'll dive in.
I've just got a tablespoon of parsley.
I'm just gonna garnish this -- touch of freshness, little pop of color right over the top.
So these are great with some lemon wedges.
After you.
-That's great.
And before I do dive in, I want to say that there's a lot more information on sources for buying oysters online, as well as some recipes for fresh oysters, too.
-I developed a mignonette granité for fresh oysters, and it's amazing.
-Great.
And you can get all that on our website.
-I know, right?
I'm going for this one.
-I'm going for this one.
-Gonna add a little bit of lemon before I dive in.
-I'm going to do whatever you're doing.
Mmm, mmm, mmm.
We're just loosening it.
Yeah.
Mmm!
-Yum?
-Gone.
-Yeah.
They're plump and they're juicy.
-Whoa!
-That butter kind of rounds out the flavors a little bit.
-So briny.
You're right.
They're concentrated a little bit.
I love raw oysters, but this has even more oyster flavor, and they're not overdone.
Ten-star review.
Just gorgeous.
Thank you, Lan.
This was magnificent.
And I think you might even convince some non-oyster eaters to climb aboard.
[ Clicks tongue ] See what I did there?
Why don't you try these beautiful oysters at home?
It starts with roasting the oysters for just 5 minutes.
Shuck the oysters while they're warm and then top with mustard butter, and then return them to the oven to finish.
So from "America's Test Kitchen," the briny, the beautiful roasted oysters on the half shell with mustard butter.
I really thought I was gonna look down and they were all gonna be gone.
-I showed some restraint.
-I love it.
♪♪ -Here in the U.S., the most popular French cheese is Brie.
-And you can tell a Brie is good and ready to eat when it feels soft to the touch.
Now, it feels firm, you should probably wait a few days, which is how I imagine baked Brie was created, because it takes a firm wheel of Brie and makes it soft and edible within the half hour.
And today Dan's gonna show us how to do it.
-So I also think that baked Brie is one of the ultimate appetizers.
-Mm-hmm.
-You have people over.
It doesn't take much effort, and it just feels special.
-Everyone goes crazy for baked Brie.
-Everyone loves it, right?
-Yep.
-So we're gonna start with our puff pastry.
Right here I have some frozen puff pastry that I thawed in the refrigerator.
-Mm-hmm.
-So I have my 9x9 puff pastry.
-Mm-hmm.
-So this is the frozen stuff.
It's really, really nice.
Keep it in the freezer.
And then when it's time to thaw, pop it in the fridge.
I'm just gonna lightly flour my counter here.
And then I'm gonna roll this out to a 12-inch square.
I like to go slow when I'm rolling things out, and I also -- I'm giving it a turn each time I roll.
-Mm-hmm.
-And that just basically means I'm not sticking to the counter.
Right?
It'll tell me right away if it is.
Okay.
Great.
I have a 12x12 square here.
I'm gonna use a pie plate.
You can use any round.
Like, a cake pan would be fine here, too.
But we want something that measures 9 inches.
-Mm-hmm.
-And then we're gonna cut out a 9-inch circle.
-Nicely done.
-Thank you.
-That looks perfect.
-I like to look and see that we don't have too much flour on here.
So that's a fine amount.
Next up, I'm gonna make a little egg wash which we're gonna use to seal this up.
So I'm just beating one whole egg.
And I'll use the egg wash.
I'm gonna brush around the whole perimeter here, looking for about an inch, inch and a half.
So here's our Brie.
So it's a firm Brie, as you were mentioning.
-Mm-hmm.
-Yep.
So it's not too soft.
It's not gonna just pour out when this is baked.
This is 8 ounces.
And it's gonna go right in the center.
And then as we go and fold it up, we're actually gonna do a little pleat on it.
That's about as fancy as I get.
-[ Laughs ] -But it does make a nice presentation.
Gonna go up and then do a little fold.
That egg wash is gonna help hold it together.
-All right, so you left a hole in the middle.
-What are you talking about?
-I'm guessing that's by design.
-It is by design.
I'm actually gonna make the hole even bigger.
-Really?
-So what I'm gonna do is peel back here, and we're basically making a beautiful little bowl shape in the middle where we can then later fill with preserves.
-Ooh, it's like a volcano!
-[ Chuckles ] Yeah.
-A Brie volcano.
Gives you quick access to the melted cheese.
-You're already thinking ahead, huh?
-I am.
-Okay, so first I'm gonna transfer this to a parchment-lined baking sheet.
And we'll use the rest of our egg wash to make this beautiful and burnished.
This is going into the freezer right now for 20 minutes.
-Okay.
-So if I wanted to do this for a party tomorrow, which I'm not -- I'm definitely gonna make it today, don't worry -- I would stop at this point, wrap it in plastic wrap, and actually put it in the refrigerator, not the freezer.
And then you could pull it out and bake it for a party.
Our Brie en Croûte has been in there for 20 minutes.
-Mm-hmm.
Dough's firmed up.
-So the freezing accomplishes two things.
First, it firms up the dough, which is really important.
We have those layers of butter and dough in there, and we want to make sure that butter is really cold before it goes into the oven.
And then it can puff and do its dramatic thing.
It also firms up the cheese a little bit... -Hmm.
-...which is great, so it won't over-melt and kind of be super runny when we pull it out.
So I'm gonna transfer this to a 425-degree oven.
And we're gonna bake for 20 to 25 minutes.
We're looking for gorgeous, golden brown on the outside.
Oh, that looks so good.
-That's beautiful, -isn't it gorgeous?
-Well, and I'm realizing now that that little hole in the top also prevents it from busting out of the sides, which I've seen quite a bit.
-Yeah, it's a really tidy little package, and it looks like it puffed gorgeously.
-Mm-hmm.
-So I'm just gonna transfer this over to a wire rack, which is gonna help keep that bottom nice and crisp as it cools a little bit.
And then our final topping here is 1/4 cup of apricot preserves.
-Ooh.
-This is where you can play with it and, you know, do what you like.
If you don't like apricot, you can go with a different kind of preserve.
So we're gonna let this cool for 30 minutes so it's not molten when we break into it.
And then we can try it.
-Okay.
[ Chuckles ] Hmm-hmm!
-Look at the spread.
Let's dig in.
-Yeah.
I love seeing the ooey-gooey Brie.
Oh-ho-ho-ho!
-That looks good.
-Nice!
-Yeah, look at that.
You can see it's spilling right out.
-Mm-hmm.
Well, and I love that the Brie has had a chance to cool down a bit, so it's not gonna burn our tongues.
I'm gonna use a little cracker just for the tip here.
Mmm!
The earthiness and that nuttiness.
-Yeah, and the puff pastry did its thing.
-Mm-hmm.
-Puffed gorgeously in there.
That egg wash on the outside -- it's a perfect wrap for that warmed Brie.
-Thank you for showing me how to make this, Dan.
-You're welcome.
-So there you have it.
If you want to make the perfect baked Brie, start by wrapping a wheel of Brie in puff pastry, leaving a little opening in the top.
Bake it at 425 degrees for about 20 minutes, and spoon some jam into that opening while it cools.
From "America's Test Kitchen," a deliciously simple recipe for baked Brie en Croûte.
I can't wait to try some other jams.
-Right?
-That'll be fun.
-Some homemade ones.
-Yeah.
♪♪ -Of all of the gin joints in all of the towns in all of the world, Jack walked into mine, and he's bringing nonalcoholic beverages, and I'm kind of excited about this.
-This is going to blow your mind... -Okay.
-...because these are really not what you think they are.
-Okay.
-So I brought four of our favorites here.
This is, you know -- it's not a test.
I really want to just expand your horizons.
-Well, my standards are pretty high when it comes to cocktails, so you got the right judge here.
-Start down here.
-All right.
-So we tasted 16.
These are both ready-to-drink cocktails as well as spirits you can use in your own cocktails.
Now, this is a ready-to-drink cocktail.
It's from a Brooklyn-based company.
They call this Phony Negroni.
-Perfect.
They nailed it.
-Yeah.
-Nailed it.
-And it has the syrupiness and the bitterness.
-The bitterness right there.
The only thing I would say is it doesn't taste that phony.
-[ Laughs ] -It just tastes like a Negroni.
-Yeah.
When I had this, I was -- this is actually my favorite cocktail.
-Yeah.
-You know, I'm thinking, "Oh, I'm in a piazza.
It's sunny."
-Right.
-"I'm in, you know, Roma.
And this is, you know, what's gonna stimulate my appetite?"
'Cause that's one of the things that bitter cocktails do.
-Sure.
Sure.
-And this totally does this.
-That's delicious.
-So the challenge here for all of these is to replicate bitterness and the burn.
-That's hard to do.
-Those are the things that make us slow down and enjoy a cocktail.
-Sure.
-So try this one and see what you think.
The technology here is fascinating.
In the early days, they were using grain alcohol to extract the flavor from all of the compounds used to create the bitterness and the burn.
Now they're coming up with new technology that doesn't even need alcohol.
So they were starting with alcohol and then removing it.
-Mmm.
-Tell me what you're thinking there.
-Really bright, incredibly drinkable, refreshing.
There's, like, a gingery thing going on there, too.
-There's ginger in that.
-Mmm!
-This one -- we're at the beach in Mexico.
-Yeah, we are.
-We're waiting for the tacos.
So this is interesting.
This is Curious Elixirs No.
2.
-Mmm.
-So they're not giving you a reference point like with the Phony Negroni.
-No comparison.
-But is it doing what a cocktail's meant to do?
As I said, distillation of big flavors, right?
All those botanicals that are in our favorite cocktails... -Sure.
-...are they coming through?
Is it making you slow down and sip it, right?
I mean, 'cause that's really what a cocktail is supposed to do.
-Right.
-And bitterness, from an evolutionary perspective -- you know, sweet things we just go crazy for.
Bitter, because we're primed to think, "Well, that could kill me"... -It's a warning sign.
Right.
-...it's a warning sign.
Hemlock is very bitter.
-Right.
How do you know this?
-[ Laughs ] -Hmm.
-So these first two were our two favorite of the ready-to-drink cocktails.
So then we're gonna move down to the spirits.
-We're doing great so far.
-All right.
-So this next one is Wilfred's.
Now, I think this is designed to replicate, like, an Aperol Spritz.
-Mmm.
-You add tonic to this.
-Okay.
-So taste this.
It's gonna be sweeter, not only because there's sugar in this Wilfred's, but because the tonic water has got sugar in it.
-Mm-hmm.
-I got a little bit of carrot and blackberry from this.
-And a little bit of peach.
-Huh.
-Hmm.
-Yeah.
It's fruitier.
It's -- I would say in the same way that... -Ooh, that's good.
-...Aperol Spritz is a little more accessible than a Negroni.
-Mm.
Mm-hmm.
-I think of Negroni as being more bitter and more grown-up.
-A little assertive.
-Yeah, just like me.
-Mm-hmm.
There you go.
-Last is a tequila replacement.
So we used their margarita recipe, so it's got lime juice, orange juice, sugar syrup.
Get out the cocktail.
You know, if you want a lot of theater and you want to make a cocktail... -Sure.
-...this is for you.
Now, try this tequila-based margarita.
-That gets you right at the right spot, right there.
-Yeah.
Now, there are chilies in that.
-Ooh!
Oh, there are, yeah.
-Right, 'cause that's -- where's the burn coming from?
There's no alcohol to give you that burn.
-Mnh-mnh.
-But tequila drinks -- they hit you, and that really hits you in the back of the throat, I think.
-You know, I mean, a great margarita is all about balance.
And without the alcohol, you'd think, "How can you possibly balance that?"
That's gorgeous.
-So I have to ask, do you have a favorite?
-What do you think I'm gonna pick?
-I think you're gonna pick the tequila-based drink, and I'm gonna pick the Phony Negroni as my favorite, but we'll see.
-I'm flipping over to this one.
-Shock.
-I know, I know.
This is gorgeous.
Love them all.
-You want to go to the beach in Mexico?
-I do want to go to the beach.
-And the ginger.
You like the ginger?
-Yeah.
Oh, I am getting that heat there, but loving the ginger.
Well, this is just about as good as it gets.
Cheers.
-Cheers.
-And if you want to learn more about these options and other nonalcoholic beverages, we've got all of that info on our website.
♪♪ -Bruschetta is a classic Italian dish, often served as an appetizer or a snack, and it consists of a good piece of bread that's grilled or toasted, then rubbed with garlic and drizzled with good olive oil.
Now, you can put other things on top, like chopped tomatoes, which is most popular here in the U.S.
But today Erin's gonna show us something different.
-I certainly am, Julia.
So there's so many more options out there than just tomatoes and basil.
-Mm-hmm.
-I mean, tomatoes and basil are great when tomatoes are in season, but that's just a few weeks out of the year.
-That's true.
-So we wanted to really focus on something that could be made year-round.
And today, canned artichokes are the star.
-Ooh, I love it.
-And the technique is brilliant.
-Okay.
-So we're gonna start with one 14-ounce can of artichokes.
-Mm-hmm.
-And I have rinsed them, and I've drained them, and I've drained them very well.
So I really want to highlight that.
We don't want any residual water here that will dilute our topping.
So I'm just gonna put these into the food processor.
2 teaspoons of lemon juice.
This is gonna give a nice brightness and acid.
And we're gonna add 1 teaspoon of minced garlic.
Gonna add 2 tablespoons of extra virgin olive oil.
You always want to use a good olive oil.
-Well, back in the day, bruschetta was popular in Tuscany.
That's where they grow lots of olives.
And it was a way to taste the fresh-pressed olive oil.
-Yeah, absolutely.
And then they started adding toppings to it.
-Yep.
-And here we are.
And there's a million different toppings.
The sky is the limit.
All right.
Now I'm gonna add 1/4 teaspoon of table salt and 1/4 teaspoon of ground black pepper.
And we're almost there.
I'm gonna cut 2 tablespoons of shredded basil.
-Oh, that's a good smell.
-Ooh, can you smell that?
-Yes.
-Mm-hmm.
So one of the problems with bruschetta is that the toppings can fall off.
-Mm-hmm.
-Basically, we're gonna make kind of like a mash, like a paste.
And that's gonna act as the glue... -Mm-hmm.
-...on the bruschetta.
So we're gonna pulse this six times until it's broken down.
-Boy, that's easy.
-Check that out.
Isn't that nice?
-Nice.
So it still has a little bit of texture.
-Has a little bit of texture.
Correct.
One last ingredient.
I'm gonna add 1 ounce of finely grated Parmesan.
-Mmm!
-This is gonna add a nice nuttiness and saltiness to our spread.
So I'm just gonna pulse this twice just to incorporate it into our mixture.
So we have the flavorful paste, which is gonna act as the glue on our bruschetta.
-Oh, that smells good.
I could just eat that with a spoon.
-I have.
[ Both laugh ] Voilà.
-Oh, nice.
-So I'm gonna use a country-style loaf here.
And it has a nice tight crumb, so it's gonna hold all of our ingredients nicely.
-Oh, that makes sense.
-All right, so I'm gonna lop off the ends.
So this is 10x5.
It's about 5 inches in diameter and about 10 inches long.
And basically now I'm just gonna slice these into 3/4-inch-thick slices, which are manageable.
It's not too thick... -Mm-hmm.
-...and it's not too thin.
I have a rimmed baking sheet here covered with foil.
Just gonna line them up into two rows.
I have my oven rack position 4 inches away from the heating element.
I'm gonna broil them for about 2 to 4 minutes, and I'm gonna flip them halfway through.
I want them nice and evenly golden brown on this side, and then I'll flip them and do the same on the second side.
Mmm, mmm, mmm.
-Perfectly toasted.
-Perfectly toasted.
So I'm going to take this half a clove of garlic... -Mm-hmm.
-...and I'm just gonna rub it on top of each one, so this is gonna add, like, a nice fresh kind of punch of garlic flavor.
-Mm-hmm.
-And the roughness of the surface of the toasted bread is acting as an abrasive.
So it's kind of chewing off a little bit of the garlic as I'm going.
So now I'm gonna brush each one with a total of 1/4 cup of extra virgin olive oil.
Again, I'm using a really nice fruity olive oil here.
And we're adding it now so that we don't lose the flavor of the olive oil.
If we heat up the olive oil, a lot of the flavor goes away.
-That's right.
-It's coming together.
-So this is essentially bruschetta in its original form.
And it tastes delicious this way, too.
-Absolutely.
Yep.
Now I'm just gonna season the toast lightly with a little bit of salt.
-[ Chuckles ] -Season it as we go.
All right.
Now we have our topping which is ready -- again, highlighting the fact that it's ready.
You don't want to make your topping after your bread comes out, or else your bread's gonna cool down and it's not gonna eat as nicely.
Okay?
So I have 10 pieces here.
I'm gonna evenly divide my filling.
This is the topping, and this has a function.
It's gonna act as the glue.
In general, when making bruschetta, you want to make the base so it acts like the glue.
Whether it's, like, a whipped cheese or whipped olives or a spread or whatever it is, it's gonna be the glue first, and then you can put more toppings on top, and then the toppings won't fall off as you eat them.
-Very clever.
-So this is our glue.
I'll give that to you.
-Thank you.
-And now we're just gonna spread this to cover the top.
-Mmm.
-All right.
All the way to the edge.
Now for the topping.
It's a very simple topping, but it's very important and it has such wonderful flavor.
So I'm gonna use more Parmesan cheese.
This is just, like, a nice last-minute thing to add.
-Yeah.
You get nice, big slices.
-Yeah.
-Very pretty.
-I'm going to drizzle a little bit more extra virgin olive oil on top.
It's gonna not only look beautiful, but it's also gonna taste beautiful.
-Yeah, this is definitely the time to bring out your good olive oil.
-Absolutely.
And then I'm gonna put a little bit of black pepper on each one.
-Gorgeous.
-All right.
-Hmm.
-Help yourself.
-Which one are you gonna take?
-Hmm.
I'm gonna take this guy.
-I'm gonna take this guy.
-All right.
-Whoa-ho-ho.
And the bread's still warm!
-Yep.
-Mmm.
Mm-hmm!
-Mm-hmm.
-It's perfect.
-Mm-hmm.
-The bread is warm, toasted on both sides but still chewy in the middle.
-Mm-hmm.
-And the topping -- the artichokes have so much flavor with the basil and the garlic and the Parmesan.
Erin, this is spectacular.
-You get, like, that -- a nice hit of garlic, but it's bright and fresh, and that Parmesan cheese.
-Mm-hmm.
-Every little simple detail pulls it together, and it's just the perfect bruschetta.
-It's perfect.
-Perfect.
All right, Julia, we have a couple of other flavor variations that you're gonna love.
-Mmm.
-Just go check them out on our website.
-Erin, this is spectacular.
Thank you.
-Thank you, Julia.
-If you want to make a killer bruschetta, start by making a flavorful topping that will stick to the bread.
Toast the bread under the broiler, and rub the toast with garlic while it's still warm.
From "America's Test Kitchen," bruschetta with artichoke hearts and Parmesan.
You can get this recipe and all the recipes from this season, along with select episodes and our product reviews, on our website, americastestkitchen.com/tv.
I feel like I could eat a lot of these.
-And we will.
-Visit our website, where you can sign up for our free e-mail newsletter for even more of the recipes and stories you love from all of our cast and cooks.
americastestkitchen.com/tv.
-From the cooks and editors of "America's Test Kitchen," "Cook's Illustrated Magazine" has been all about the why and how of cooking for over 30 years.
Get a year of award-winning reporting, science-based discoveries, trusted reviews, and more.
The cost is $19.95.
That's 63% less than the cover price.
To subscribe, scan the QR code on your screen or visit CooksIllustrated.com /TVsubscribe.
"America's Test Kitchen" is brought to you by the following.
-Plugrà European-style butter was created for all chefs, cooks, and bakers, slow-churned with 82% butterfat for a smooth texture and more pliability for flaky crusts.
Plugrà -- from professional kitchens to your home.
-Sur La Table, where you can discover an assortment of provisions for your next meal or gathering, from cookware and tools from a wide variety of kitchen brands to hands-on cooking classes.
Visit us at surlatable.com.
♪♪ ♪♪ ♪♪ ♪♪ ♪♪ ♪♪ ♪♪ ♪♪


Support for PBS provided by:
America's Test Kitchen is presented by your local public television station.
Distributed nationally by American Public Television