Savory and Sweet Italian
11/10/2021 | 24m 59sVideo has Closed Captions
Test cook Dan Souza makes host Bridget the best Meat Ravioli with Quick Tomato Sauce
Test cook Dan Souza makes host Bridget Lancaster the best Meat Ravioli with Quick Tomato Sauce. Then, tasting expert Jack Bishop challenges host Julia Collin Davison to a taste test of unsweetened chocolate. Finally, test cook Keith Dresser shares the secret to perfect Torta Caprese.
Problems with Closed Captions? Closed Captioning Feedback
Problems with Closed Captions? Closed Captioning Feedback
America's Test Kitchen is presented by your local public television station.
Distributed nationally by American Public Television
Savory and Sweet Italian
11/10/2021 | 24m 59sVideo has Closed Captions
Test cook Dan Souza makes host Bridget Lancaster the best Meat Ravioli with Quick Tomato Sauce. Then, tasting expert Jack Bishop challenges host Julia Collin Davison to a taste test of unsweetened chocolate. Finally, test cook Keith Dresser shares the secret to perfect Torta Caprese.
Problems with Closed Captions? Closed Captioning Feedback
How to Watch America's Test Kitchen
America's Test Kitchen is available to stream on pbs.org and the free PBS App, available on iPhone, Apple TV, Android TV, Android smartphones, Amazon Fire TV, Amazon Fire Tablet, Roku, Samsung Smart TV, and Vizio.
Providing Support for PBS.org
Learn Moreabout PBS online sponsorship♪♪ ♪♪ ♪♪ ♪♪ ♪♪ -Today on "America's Test Kitchen," Dan makes Bridget a classic meat ravioli, Jack challenges Julia to a taste test of unsweetened chocolate, and Keith makes Julia the ultimate torta caprese.
It's all coming up right here on "America's Test Kitchen."
♪♪ -There's making homemade pasta, and then there's making homemade filled pasta, like ravioli.
That's a whole 'nother level.
You got to roll out the dough, you fill it, you cook it, only to find all that filling just explodes out of the pasta and into your pasta water.
Well, you need a foolproof recipe, and Dan's here to provide.
-I am your foolproof guy.
-I know you are.
-So, I think making handmade ravioli is one of the most satisfying projects out there, but like you said, if it doesn't work out in the end, it's not very satisfying.
-You get soup.
-You get soup.
And it all starts with a dough that is really malleable and easy to work with.
So that's what we're gonna do here.
-We've got 2 cups of all-purpose flour in here.
We're starting with two whole eggs.
Now I'm adding six egg yolks.
Yolks are great because they add a lot of fat and liquid, so they're gonna make it softer and easier to work with.
-Pliable.
-Pliable.
But because of all the protein in there, as it sets in the water, you're gonna get something with a beautiful, delicate bite to it.
-Nice.
-Now I'm adding 2 tablespoons of extra virgin olive oil.
Alright.
So, and I'm using my food processor.
It is the fastest way to actually make the dough.
-Okay.
-It's only gonna take about 45 seconds to bring this together.
Okay, great.
You'll see that it hasn't formed a dough, and it's not rolling around.
-Right.
-That's okay.
We do a test by picking up some of it here and giving it a little pinch.
Egg sizes vary, so if it holds together nice and smooth like that... -Nice.
-...it is perfect.
-Okay.
-So, I'm just gonna bring this together here and give it a little bit of counter kneading, and then I'm just gonna roll it out here a little bit.
We want roughly a 6-inch cylinder.
A lot of gluten formation.
We want to let that relax, as we do with any kind of bread dough.
So I'm gonna wrap this in plastic.
-Okay.
-We're gonna let it sit for at least an hour or up to 4 hours at room temperature, and the really nice thing about that is that gluten's gonna relax.
It's not gonna be cold coming out of the fridge, so it's gonna be really easy to work with.
I think you'll be surprised at how easy I can roll this out.
Now, you could fill this pasta with anything and it's gonna be delicious.
You know, a nice cheese ravioli, I love, but today, we're gonna make a meat ravioli that's rich in pork and tons of spices.
So, we're gonna have some ingredients here that mimic a panade.
This is two slices of white bread that I just kind of tore into rough pieces.
I've also got an ounce of Parmesan cheese... -Mm.
-...for flavor.
We're gonna add some liquid, so I have 1/4 cup of chicken broth.
That plus our egg and the bread, that's the heart of the panade.
-Right.
-So we have an egg here, as well.
And then for more seasoning, we're gonna have 2 tablespoons of parsley, which is minced.
I have two garlic cloves minced, a teaspoon of table salt, a teaspoon of ground fennel, 3/4 teaspoon of lemon zest.
I've also got 1/2 teaspoon of pepper and, finally, 1/2 teaspoon of dry mustard.
-Hmm!
-Alright.
So, now I'm gonna pop this lid on and process this until it is smooth, which takes about 15 seconds.
Okay.
That is nice and smooth, so now it is time for our pork.
So, we've got a pound of ground pork here.
I'm just gonna pulse this about five pulses, until it's combined.
You don't want to overdo this, but you can see when it's done right.
-Okay.
-Alright.
That looks great.
So, I'm gonna cover this with plastic, and we'll pop it in the fridge while we let our dough rest.
-Alright.
-Okay, so this is a 4-hour rested dough.
We're gonna break this down now into six pieces.
Just kind of mark my lines first, so I've got half there, one there and one there.
It's nice to work with pretty equal pieces.
That way, when you're rolling it out, you can look at dimensions and have a good idea of where you are.
-Alright.
-So, I'm gonna work with one piece at a time, and it's important to keep the rest wrapped up so it doesn't dry out.
Have some bench flour here.
We're gonna use it only as we need to, to prevent sticking.
This wooden board is really nice.
If you have a nice wooden cutting board, it won't grab as much.
-Okay.
-So, I got a little flour.
I'm gonna dust both sides of this with it, and I'm gonna pat this out into a 3-inch square.
Looks good.
So, now that I have a rough square here, about 3x3, I'm gonna use my rolling pin, and now I'm gonna take it out to a 6x6-inch square.
-Okay.
-So, we're at 6 inches there.
So, now I'm gonna do another flouring -- get my board a little bit and the top.
Want to rub that in.
So, I'm gonna start rolling.
I like to start in the middle and roll out, and then start in the middle and roll down.
Now, if you've ever tried to roll out just regular pasta dough before... -Mm, yes.
-...you know that you can't talk while you're also doing it because you're bearing down so hard on it.
This is easy.
-Yeah?
-It's so soft.
Yeah.
It basically wants to roll itself out.
-Oh!
-It's a very, very soft dough.
So, I'm just lifting this up occasionally as it starts to cling a little bit more.
I don't need new flour yet, but if I do, I can absolutely add it.
Okay, so now we are at about 12 inches, and I'm gonna keep going until I get to about 20 inches long -- -Oh, wow.
-...about 6 inches wide.
So it's really what would come out of a pasta machine.
Okay, beautiful.
That looks awesome.
Gonna transfer it over to a parchment-lined baking sheet.
You can always do a little fold on that there.
We'll cover it with plastic.
This will keep it from drying out.
We'll do the rest of these, and then it'll be time to fill and cook.
-Sounds great.
-Okay.
So, now, the really fun part is forming the raviolis.
We've got everything set up here, and it really helps to have a nice orderly process.
We've got our formed sheets.
We've got our filling here with a nice 1-tablespoon measure.
That's how much we're gonna want in each one.
And I've got my nice dough here.
So, I'm trimming the ends of this pasta sheet so that they're nice and square and we have 18 inches of pasta to work with.
Just makes the process a lot easier.
Alright, the next step is to get some egg white on here.
So, the egg white is gonna help it stick together -- -Gotcha.
-...after we put the filling in.
It's actually gonna bind the pasta together really nicely.
Okay, great.
So, I'm gonna work with a tablespoon of filling.
One of the easy mistakes to make with ravioli is, you just want to fill them up with all that awesome filling.
Don't do that.
You need enough space to really crimp around the sides, so you want to be an inch from the bottom and about 1 1/2 inches between them.
-Okay.
-So you get five to six, depending on the size of your sheet.
So, the next step here is cut first and then fold over.
-Oh, nice.
-So, we've got everything spaced out nicely, and then I go right between them and cut right through.
Okay, great.
So, I'm gonna fold this over, and we want it to touch here so we get a nice border around, not go right up to the filling.
-Gotcha.
-And the goal here is to get rid of as much air as possible, so I'm kind of pressing as I go around the sides.
Funnel all that air to the front, stretch that pasta, and then once we get to the end there, then we're sealing it up.
-Nice-size ravioli, too.
-So, it's super important to kind of squeeze out that last little bit of air.
When that goes into boiling water and that air expands, that's when you get those burst raviolis, which is so upsetting.
Okay, perfect.
So I'll set that aside, keep going with these.
So, the next step here is to put a beautiful border on the sides.
You can use your knife to do it, and it'll look really nice, nice and straight.
If you've got a fluted pastry wheel, it's also really nice.
That's what we're gonna do here.
Looking for about 1/4 inch around the edge -- also helps kind of finish that seal off.
-So pretty.
-So pretty.
And we're gonna turn it this way and repeat on these sides.
And because there's only two of us, we're gonna cook off half of these today, but we're also gonna freeze half of them.
And that's what's really nice about this recipe -- when you make them, you can freeze as many as you want.
So, what we're gonna do is lay them out on a parchment-lined baking sheet, freeze them in a single layer, and then you can transfer them to a zipper-lock bag and store them for up to a month.
Alright.
Look at these gorgeous ravioli.
-Stunning.
-Stunning, right?
-Yeah!
-So, I've got a pot of boiling water over here.
I'm gonna add 1 1/2 teaspoons of table salt to this, and then I'm gonna put some raviolis in there.
I'm thinking maybe eight each?
-Sure.
-Alright.
So, just drop these in nice and gently.
Beautiful.
-Alright.
-So, we don't want to boil these.
That's another thing that can kind of cause them to rupture.
-Sure.
-So we're gonna simmer them for 13 minutes.
So another reason you don't want to precook that meat is, these are gonna be in here for 13 minutes, so it's the perfect cook time to get them just cooked through.
-Alright.
Great.
-So, while that goes, I also have some sauce over here, which we're gonna serve them with.
This is our quick tomato sauce.
-Mm, perfect.
And you can get the tomato sauce recipe on our web site.
-13 minutes, it'll be time to eat.
Okay, perfect.
These look awesome.
No blowouts.
-Not a single one.
-So, that's been 13 minutes.
I'm gonna shut the heat off.
So, I want to take my pasta out here.
With ravioli, you want to be really, really delicate.
Just gonna take them out like this and then transfer them over.
-How beautiful.
-Alright.
And now we have our beautiful quick tomato sauce standing ready.
Can I dust you a little Parmesan?
-Please do.
-Let's see what they taste like, huh?
-Nice and tender.
That looks gorgeous.
-They look nice.
-Mmm.
That interior is so tender.
When you bite into it, it just melts.
Garlic, parsley.
I'm telling you, the mustard is what seals it.
-That seals the deal for you?
-Yeah.
-What I love is, the pasta is just cooked through and tender.
It seems like a lot of time in the water there, but you have a nice bite, a nice resiliency to it.
-You did it -- foolproof ravioli.
-Thank you.
-And I said it couldn't be done, and you proved me wrong.
-That's the best.
I love proving you wrong and making great ravioli at the same time.
-[ Chuckles ] Mission accomplished.
If you want to make these great meat-filled raviolis, it starts with a food-processor pasta dough.
Make a panade with bread, Parmesan, broth, and seasonings, then pulse in ground pork.
Roll out pieces of dough, trim, and then top with mounds of the filling.
Fold the pasta over, press to seal, and cut with a fluted pastry wheel.
Cook them until tender, drain, and top with a beautiful sauce.
So from "America's Test Kitchen" to your kitchen, a great recipe for meat ravioli.
Thanks, Dan.
-You're welcome.
♪♪ -Unsweetened chocolate is one of the purest forms of chocolate that you can find at the supermarket.
Other types have added sugar or dairy, but unsweetened chocolate is simply made from processed cacao beans, so it packs a powerful chocolate punch.
And Jack's here to tell us which brand is best.
-No punching.
-[ Laughs ] I promise.
-Yeah, so, this is a really interesting taste test.
As you know, generally, we open the packages, and we start eating.
-[ Laughs ] -I didn't do that here.
So, these are hot fudge sauces.
-Ooh!
-They're very simple.
You can start digging in.
They have four ingredients -- unsweetened chocolate... -Mm-hmm.
-...sweetened condensed milk, a little bit of vanilla, and a pinch of salt.
You want real fudgy flavor.
-Yeah.
-We use unsweetened chocolate in chocolate volcano cake, brownies.
Really, when we want fudgy texture along with big chocolate flavor, that's what we're doing.
So, as you're tasting... -Mm.
-...you're going to be tasting chocolate.
-[ Chuckles ] -You know, they're all the same in some regards.
All of these are 100% cacao, but because of the way that the cacao beans are sourced, fermented, and roasted, you can get different flavor profiles.
And so some of these are more caramelly, roasted, espresso-y.
Some are fruity, even a little acidic or sour.
Some are what I would just call classic.
-So, good news -- none of them are terrible, actually, for me.
This one tasted pretty bland to me.
I didn't like this version.
-Okay.
-This one was my favorite.
It might have had a slight gritty texture.
I'm not sure about that, because I ate a lot of it.
[ Laughs ] But this one had caramelly, deep, round notes that I really appreciated.
This one had more flavor than the others, but I couldn't identify what that flavor was.
-The good news -- you've done very well.
-Oh, I did?
Okay.
-You picked the winner.
-Ah!
-This is Baker's -- it's a 200-and-almost-50-year-old brand at this point.
Very well-known, classic choice.
It was top of the rankings because it had classic flavor.
It's delicious unsweetened chocolate.
-Alright.
So, this one was my runner-up.
-So, this is the Scharffen Berger, which had the fruity notes... -Yeah.
-...which either you loved or you didn't love, but it was different, and you noticed it was different.
-Mm-hmm.
-And you liked different.
A lot of our tasters were like, "Oh, no, no, no.
Just give me the plain old, boring, regular chocolate."
And that was the one where people were tasting citrus and banana, and it wasn't just me suggesting it.
You were actually tasting it.
-It was in there.
Alright.
Now, what about this one?
I actually had very little to say about this one.
It was just fine.
-So, this was Ghirardelli.
With the exception of the Scharffen Berger, we ended up recommending all of them.
The Scharffen Berger was recommended with reservations.
This one had more, I would say, of the roasted notes in it, and it was in the middle of the pack.
-Okay.
And last but not least... -Yeah.
Now, this was the Guittard.
This was a runner-up.
The differences throughout, with perhaps the exception of the one on the end, were really very minimal between these brands.
-So, there you have it.
Our winning unsweetened chocolate is Baker's Unsweetened Baking Chocolate Bar, and it's about $3 for a 4-ounce bar.
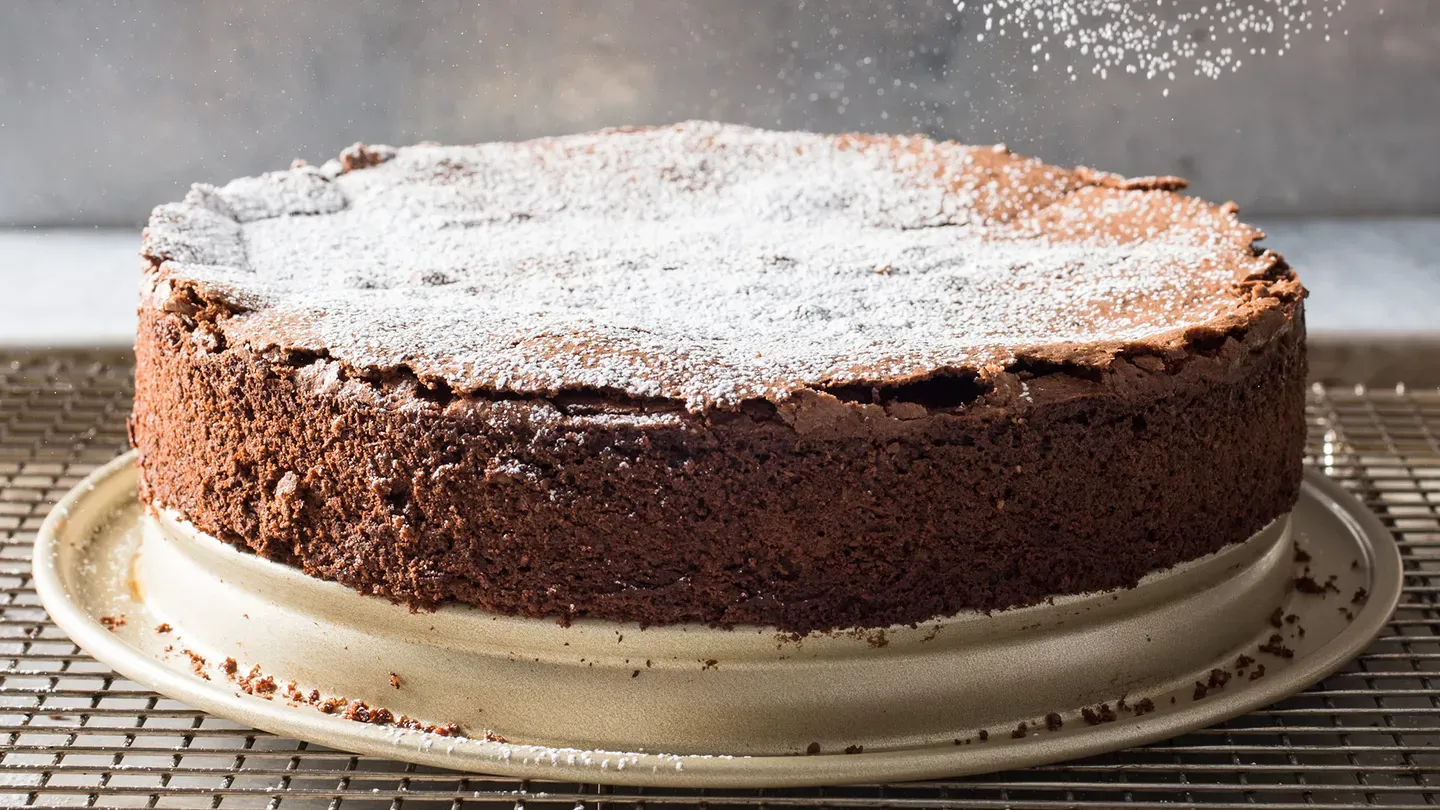
♪♪ Torta caprese is a classic flourless cake from the Isle of Capri, and it's made with chocolate and almonds.
Now, it has several origin stories.
Some include princesses, some include the Mafia, but they almost all include a forgetful cook who forgot to add the flour, which is why this cake is often referred to as "uno dei pasticci piu fortunati della storia," or one of history's most fortunate mistakes.
And today, Keith's gonna show us how easy it is to make at home.
-Yeah, Julia.
This is my kind of cake.
There are no layers to assemble, no fussy decorations.
It's a single-layer cake with a fudgy texture, a great super chocolaty flavor, and this Italian version's a little lighter, a little bit more elegant.
So, we're gonna start with our chocolate base.
I have 6 ounces of bittersweet chocolate here that I'm gonna chop up, and I like to do this with a serrated knife.
-Mm-hmm.
-It's a little easier to use than a chef's knife.
Those teeth will kind of grab on to that chocolate and get it nice and fine.
-So, you said this is bittersweet chocolate, and I know our favorite is 60%.
Is that what we're using today?
-That is exactly what we're using today -- 60%.
You could probably use something with a little bit more, maybe up to 70%.
But you probably don't want to go too much more than 70%, because then you start to throw off the balance of sugar and the cacao in there.
Okay.
So, that's our 6 ounces of chocolate.
I'm gonna add that to the bowl with 12 tablespoons of unsalted butter that we've cut into 12 pieces.
So, we're just gonna melt this really quickly in the microwave.
At 50% power, it's gonna take a minute and a half to 2 minutes, and we're gonna stir it occasionally.
Julia, our chocolate-and-butter mixture is out of the microwave, and it's nice and smooth.
-Mm!
-I'm gonna add a teaspoon of vanilla extract to this, and that's just gonna give the cake a little bit more complexity, and it pairs nicely with that chocolate flavor.
I'll just stir that in, and then we can just let that rest.
Now we can work with our eggs.
There is no flour in this cake, no chemical leavener, so all the lift in this cake is done by the eggs.
What we found was best was to separate the eggs into whites and yolks, whip them separately, and then incorporate them into the batter separately.
-Okay.
-So I have two eggs that have already been separated here.
I'm gonna separate two more.
Now, I have a tendency to break shells and crack the yolks.
If you get any yolks into your whites, then you're gonna have a problem whipping them, so that's why I always separate eggs into a single bowl and then transfer them over.
So I'm gonna add our four egg whites to our mixer bowl.
I'm gonna start this on medium-low speed, and what I want to do is kind of want to break up that egg-white mixture.
They're kind of ropy right now.
And then once we get a little bit of air into it, I'm gonna increase it to medium-high, and I'm gonna slowly add 1/2 cup of granulated sugar, and that's gonna stabilize those egg whites perfectly.
So you can see, it's been about a minute, and we've started to get those egg whites foamy.
Now it's time to add 1/2 cup of sugar.
I'm gonna add this slowly with the mixer running at medium-high speed.
Okay.
It's been about four minutes.
These egg whites have increased in volume, and they're nice and glossy.
And they should hold a fairly nice, stiff peak.
Now I'm gonna transfer this over to this large bowl here.
That's gonna add a ton of volume to this cake.
If I can ask you to set that aside... -Sure thing.
-Now we are gonna whip our egg yolks.
We have our four egg yolks.
We'll put that into the bowl, and I have another 1/2 cup of granulated sugar here.
I don't have to add this slowly.
I can add this right at the same time as the yolks.
We're also gonna mix this on medium-high until it's light and fluffy and we have air incorporated into the yolks, as well, and that should take about three to four minutes.
Okay, it's been three minutes, and you can see how light and fluffy those egg yolks have gotten.
It doesn't even resemble egg yolks.
-Not even close.
-Yes.
That's gonna incorporate all that air into that cake and give it a nice structure.
So, we're gonna add the rest of these ingredients in stages here, first to our egg yolks, and then we'll fold in our egg whites later.
-So, first step -- the chocolate.
-I know -- could probably just eat this by itself.
-[ Laughs ] -Okay.
We have our chocolate-and-butter mixture in there.
I'm gonna incorporate that into the egg yolks.
It's gonna be 15 seconds on medium speed.
Looks good.
-Looks great.
-So, we are using almonds today.
Now, when we first started development, we were grinding our own almonds in the food processor -- came out fine, but we've found so many almond meals and almond flours on the market that we just went with a commercial variety.
We have 2 cups of almond meal here.
Now, there is a slight difference between almond meal and almond flour.
Traditionally, almond meal has the skins on the almond, whereas almond flour has no skins.
It's blanched almonds.
We didn't really find any taste difference.
Almonds are fairly mild to begin with, and it didn't affect the texture of it, so you really can use what you want to use.
We have almond meal today.
This is 2 cups, or about 7 ounces.
I'm gonna add 2 tablespoons of Dutch-process cocoa.
That's gonna add a little bit more chocolate flavor to our cake, and I have 1/2 teaspoon of table salt here.
It's always important to add salt to baked goods.
It accentuates the flavor and brings out those nice chocolate notes.
Okay.
So, I'm gonna incorporate these dry ingredients into our chocolate mixture for about 30 seconds at medium speed.
Okay.
So, that's all worked in there, and I'm just gonna give this a quick scrape on the bottom.
We want to make sure that everything is incorporated before we put our egg whites in here.
You can see that I have some egg yolks in the bottom there.
I'm just gonna fold this over.
But since this mixture is so thick and we're already in the mixer, we're actually gonna lighten it with the egg whites in the mixer -- a third of that -- and then we're gonna take that mixture and put it on top of our egg whites.
-Oh, okay.
-So it's kind of a reverse fold.
-Hmm.
-It's gonna be 15 seconds on medium speed.
Okay, you can see that that's lightened up that chocolate mixture quite a bit, and now we're ready to fold it into the main part of the egg whites.
-That is a very dense mixture.
-Yeah, it's fairly thick.
-Smells good.
-Okay.
Now I'm gonna switch over to a rubber spatula that's a little wider.
It's a little easier to fold with.
So, cut down through the center, sweep up the sides.
-When you're folding in whipped egg whites, you want to do it very gently so you don't lose that loft.
-This is looking pretty good here.
So, we're gonna bake our cake in a 9-inch springform pan, which we've sprayed with vegetable-oil spray.
So with a springform pan, we can loosen the sides, take it off, and we don't have to worry about breaking our cake.
-Makes sense.
-Okay.
It's fairly thick, so I just want to help spread it out on the pan.
-Okay.
That looks great to me.
So, I'm gonna bake this in a 325-degree oven for about 50 minutes on the middle rack.
I'm gonna rotate it halfway through, and we'll test it with a toothpick to see if it's done.
-The eggs have some heavy lifting to do in that torta caprese since they are the sole source of leavening and structure.
And as Keith mentioned, we found it important to whip the yolks and whites separately.
Here's why.
First, let's take a look at what happens when you whip egg whites.
As the whites move through the whisk, the proteins begin to denature and cling to each other, which traps air and creates a sturdy foam.
Now, this egg-white foam isn't sturdy enough on its own to support the heavy torta, and that's where the whipped egg yolks come in.
They incorporate more air into the batter and loosen it up so the egg whites don't deflate.
Yet when egg yolks and whites are whipped together, it's almost impossible to form a good foam because the yolk fat impedes the whites' ability to incorporate air.
The egg-white proteins cling to the yolk fat instead of making room for air.
So, for the ultimate torta caprese, you've got to keep those egg whites and yolks separated.
Mmm!
You can start to smell that chocolate.
-Ah, yeah.
It looks great, too.
Okay, so let's test this and make sure it's done.
Just gonna put a toothpick in the center here.
That looks great.
A few moist crumbs is fine.
We don't want it to be clean, but we don't want really heavy, moist crumbs on there.
So, I'm gonna let the cake cool on the wire rack for 20 minutes.
After 20 minutes, we'll remove the outside of the springform pan, and we'll let it cool for two hours.
I think it's time to garnish and eat our cake.
So, it's cooled for two hours, and it's gonna be a room temperature right now, and I'm just gonna do a quick garnish of powdered sugar.
And this is my kind of decoration here.
-Nice and easy?
-I know.
-Aw.
Looks beautiful.
-It's like snow.
I'm just gonna take an offset spatula and run it underneath that cake to separate it from the bottom of the springform pan.
Looks like that nonstick cooking spray has done its job.
Now it's time to cut.
So, I have a chef's knife that I've put in some warm water.
If you're ever slicing a chocolate cake, this is a really key step here.
Make sure that that knife blade is warm.
You wipe it off, make sure you have no water on there.
Oh, you can see that nice crusty top on.
-Mm-hmm.
Mm, that looks good.
-Let's try this out.
Beautiful.
-I can tell by putting the fork through it that it's not super dense and fudgy.
It's got a lighter consistency.
-Mm-hmm.
-Mmm!
It is such an ethereal texture -- almost dissolves on your palate as you eat it.
And you're left with this strong chocolate flavor and a little bit of almond.
-Yeah.
-That's delicious.
-And a lot of flourless chocolate cakes are really dense, almost like a brownie.
-Mm-hmm.
-And that almond meal has kind of lightened it up so it's not so dense, but you don't lose any chocolate flavor.
-This is my kind of cake.
-Mm.
-Simple, elegant, not heavy and dense, but just leaves you with a lovely flavor.
Well, Keith, this is absolutely delicious.
And I know they said it was a great mistake -- I don't even know how you could call this a mistake.
-No.
I agree with you.
-[ Laughs ] Thank you.
-You're welcome.
-So, if you want to make this classic Italian chocolate cake, melt bittersweet chocolate with some butter and let it cool while whipping egg whites to glossy stiff peaks.
Whip egg yolks until slightly thickened.
Then whip in the melted chocolate, almond meal, and unsweetened cocoa, followed by some of the egg whites.
Fold in the remaining egg whites by hand, then bake for just under an hour.
Let it cool completely and garnish with powdered sugar before serving.
From "America's Test Kitchen" to your kitchen, a foolproof recipe for torta caprese.
You can get this recipe and all the recipes from this season along with our tastings, testings, and select episodes at our website, americastestkitchen.com.
Keith, this is awesome.
-Yep.
Maybe we can make this in Italy next time.
-Deal.
-Let us help you with dinner tonight.
Visit our website anytime for free access to the newest season's recipes, taste tests, and equipment ratings, or to watch current-season episodes.
Log on to americastestkitchen.com/tv.
♪♪ ♪♪ ♪♪ ♪♪ ♪♪ ♪♪ ♪♪


Support for PBS provided by:
America's Test Kitchen is presented by your local public television station.
Distributed nationally by American Public Television